
Enjoying Mushrooms at Home in a Miniature Greenhouse
I really enjoy mushrooms in food. Their versatility across a variety of dishes and the culinary diversification they offer are incredible. However, for a long time, I was under the assumption that growing mushrooms was a complex and highly specialised process.
This thought started from a school day trip I took years ago. We were taken to an underground mushroom farm where they cultivated button mushrooms on long trays inside a bunker. To my ten-year-old self, that day was great for all the “wrong” reasons. It meant a field trip, no school and more importantly no schoolwork. That was, obviously, until we were tasked with writing an essay about what we had seen. For a group of kids, the process looked like advanced calculus. Therefore this co-relation stuck in my mind: mushroom growing equals difficult.
A few years back, while browsing a garden nursery, I spotted a plastic bag containing a large, white block labelled as a “Mushroom Growing Kit”. Intrigued, I skimmed through the instructions. Driven solely by pure curiosity, I popped it into my basket along with the rest of the plants. That was the start of an incredibly satisfying journey into a brand-new hobby.
The initial Dilemma
One immediate challenge I faced was deciding where to keep the newly purchased kit. After some research, ranging from damp, dark cupboards to bright windowsills and everywhere in between, I stumbled across the Martha Tent.
The name sounds entirely unrelated to mycology and in fact, it is. It actually originates from the tiered Martha Stewart zip-up storage closets. While you can find incredibly complex, automated variations of this setup online, in essence a Martha tent is simply a small, tiered greenhouse (plastic or glass) that most people use to protect delicate plants from the elements. It occupies a small footprint, making it ideal for a cosy corner indoors or a sheltered spot in the garden.
From Manual to Automated
If you are just testing the waters, you do not need a fully automated rig. However, if you want to scale up or reduce manual maintenance, adding a few technical components transforms the tent into an optimised fruiting chamber.
Hygiene First
Before introducing anything to your tent, cleanliness is paramount. Fungi operate in a highly competitive biological niche. “Bad” fungi, like green mold (Trichoderma), compete directly with your mushroom mycelium for nutrients and can ruin a crop instantly. Keeping your setup sterile is essential; a simple wipe-down with 70% isopropyl alcohol (surgical spirit) does the trick perfectly.
Humidity Control
Mushrooms require high humidity, typically between 85% and 95%.
- The Manual Route: If you have one or two kits, a simple spray bottle works fine. Misting the kit and the tent walls a few times a day keeps the environment damp.
- The Automated Route: If you scale up, manual misting becomes a chore. A small ultrasonic humidifier (typically costing between €30 and €60) placed inside or piped into the tent keeps constant moisture levels without having your arm aching with all the manual spraying.
Fresh Air Exchange (FAE) and Exhaust Fans
Unlike plants, which consume carbon dioxide and release oxygen, mushrooms breathe just like humans: they inhale oxygen and exhale CO2 (Carbon Dioxide).
In a sealed plastic tent, CO2 builds up really quickly. High CO2 levels cause mushrooms to grow weirdly. They tend to grow long, spindly stems and tiny caps as they desperately stretch out searching for fresh air. Technically, you can manually unzip the tent a few times a day to exchange the air but you then need to spray the tent as this disrupts your humidity levels.
An exhaust fan (a simple computer fan or a small inline duct fan) solves this. It pulls fresh oxygen into the tent while expelling CO2. Ideally, attach a flexible duct pipe to the fan to vent the exhaust air directly outside (outdoor not in the room)
Environmental Controllers
The ultimate upgrade is a digital environmental controller. These units utilise sensors placed inside the tent to monitor humidity and CO2. The moment humidity drops below 85% or CO2 climbs too high, the controller automatically triggers the humidifier or the exhaust fan, a neat trick! Thus maintaining a perfect microclimate all day.
Location, Location, Location
If you choose to set up a Martha tent indoors, where you place it requires careful consideration. When mushrooms mature, they release millions of microscopic spores.
- Where to avoid: Never place your tent in a bedroom, living area or a carpeted space. An accumulation of spores can trigger respiratory irritation and settle into carpets, potentially creating mould issues.
- Where to build: Ideally look for places like a garage, utility room, spare room or attic. Somewhere with direct access to a window or vent where your exhaust ducting can safely expel spores and CO2 outdoors.
Now of course, I must introduce the data and metrics layer, because of course why keep things simple and fun.
The Data Layer: Measuring the Mushroom Colony
For those who like me, want to take their cultivation a step further, let’s look at turning a basic Martha tent into a data-driven smart ecosystem. Mushrooms are highly sensitive to micro-climatic shifts; tracking environmental metrics, you move from guessing why a mushroom flush succeeded or failed to knowing the exact variables responsible.
To build a comprehensive picture of your tent’s health, you need to collect data on four primary variables:
- Humidity or rather Relative Humidity (RH)
- Temperature
- Carbon Dioxide (CO2)
- Fresh air exchange (FAE)
Turning Logs into Insights
Once your sensors are fully operational, start logging data to a time-series database (like InfluxDB or a simple SQLite instance). From there you can build a dashboard using platforms like Grafana or custom Python (Dash/Streamlit) apps.
Some examples that I use from my own Martha Tent
The Pulses
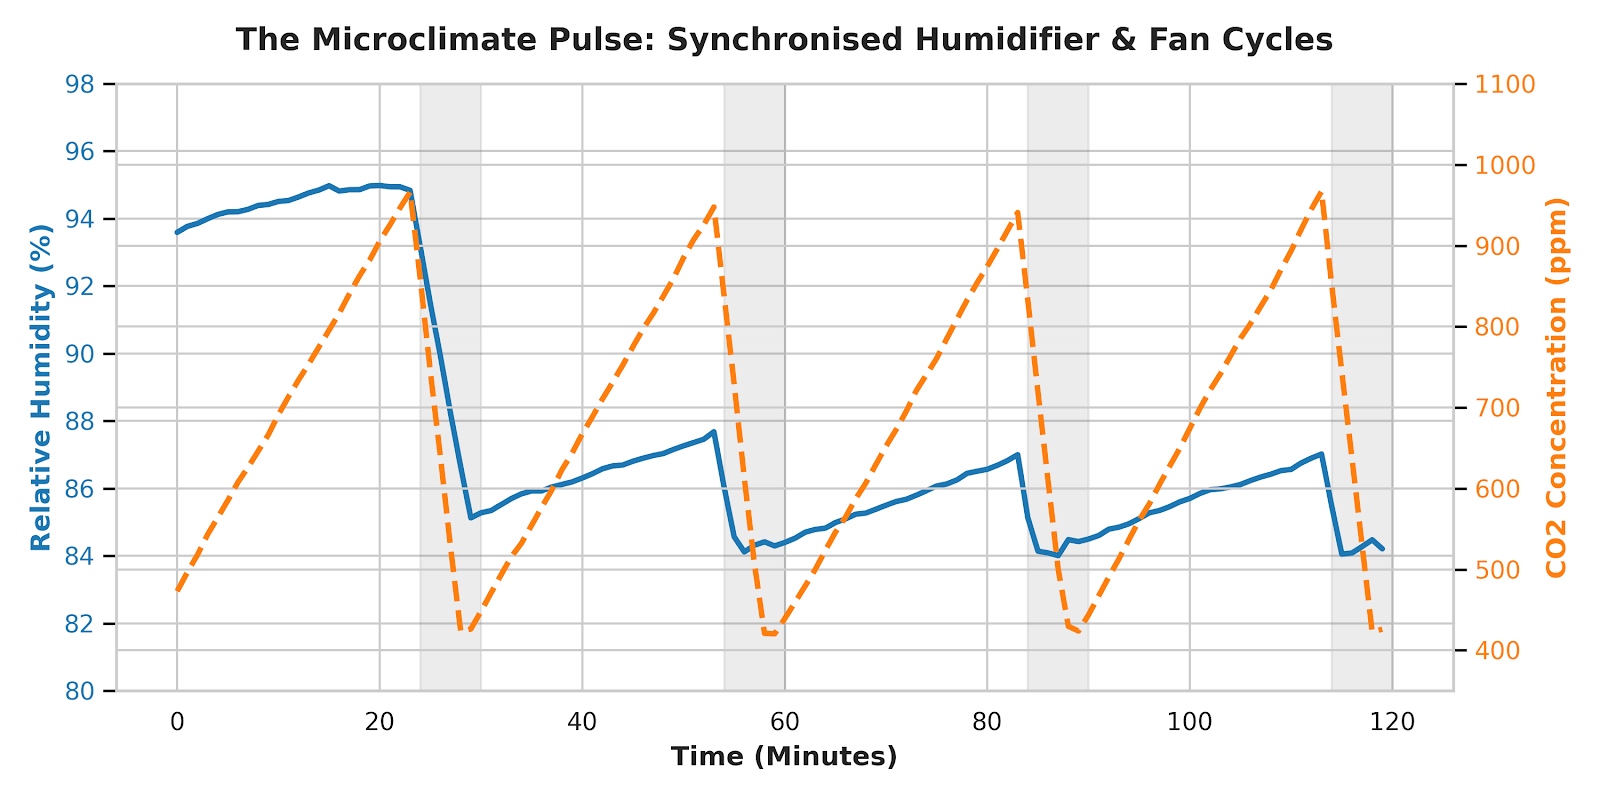
Plot Relative Humidity on the primary Y-axis and CO2 levels (ppm) on the secondary Y-axis against time. You should see a pulse or sawtooth graph because there would be a rise of CO2 in time, when the threshold is hit, the exhaust fan kicks in and CO2 level drops, therefore a dip in your graph. If your pulses are symmetric or widen through time, it is an indicator that your humidifier is low, not working as it should or even the your exhaust fan is a little too powerful for your setup.
Fan Efficiency
Plot Fan Run-Time (seconds) against CO2 Drop Rate. Notice the increase in time after a while. If it starts to increase then it means that the fan is taking longer to clear the CO2. Which would mean that you fan is being clogged up by spores or dust.
Other examples would be plotting yield vs Temperature. Calculate the actual yield in weight versus your tent’s temperature to map the perfect sweet spot.
From a Kit to a Strategy
I must say that while a basic mushroom kit in a Martha tent relies of manual labour or a few mechanical timers, adding the environmental controllers with some simple data visualisations transforms the experience completely. Yes I must admit that most of us just want to enjoy seeing a gourmet mushroom grow, but the idea that we can bridge the gap between the biological science and data engineering to optimise energy consumption and yield is fascinating.